
IMPORTANT UPDATE: ActiveProspect has just released a new security update which will affect clients who are claiming their own lead certificates. This means that you will now need to verify your domain in order to properly claim the certificate. This is to ensure that your leads will not be able to be claimed from any other domain source, and using their auto-retain feature, the certificate gets saved automatically on your Trused Form account.
You can refer here: https://community.activeprospect.com/posts/4812756-trustedform-retain-using-the-auto-retain-method-to-store-certificates-for-first
Unfortunately, you can only implement this process using Custom domains in Leadshook. You will need to have your own custom domain in order to continue using TrustedFrom.
You can refer here on how to add your own custom domain in Leadshook: https://www.leadshook.com/help/how-to-display-your-decision-trees-on-your-own-domain/
Kindly refer here for their update: https://community.activeprospect.com/posts/4649879-verify-domain-ownership
A for users who are selling Leads and having their buyers claim the certificate, then you do not need to verify your domain and use their auto-retain feature.
Introduction
In this article, you’ll learn how to add TrustedForm by ActiveProspect to your decision trees for TCPA-compliant leads…
Learn more about meeting your TCPA compliance requirements using TrustedForm here:
https://activeprospect.com/products/trustedform/
Step-by-Step Instructions:
Step 1: CREATE CUSTOM FIELDS
Please create 3 custom fields..
- Text field called “trustedformfired“. This is an optional field to make it easy to troubleshoot any implementation problems.
- Text field called “xxtrustedformcerturl“. Mandatory field. This is the field that saves your Trusted Form url.
- Text field called “trustedformsaved“. This is an optional field which is updated once the script that saves your Trusted Form Certificate is saved.
Step 2: Copy and Paste Trusted Form Script That Generates Your Certificate
This script fires when your decision tree loads. It works similar to how most tracking pixels work.
Copy/paste the Trusted Form script into the decision tree level, or global level script section.
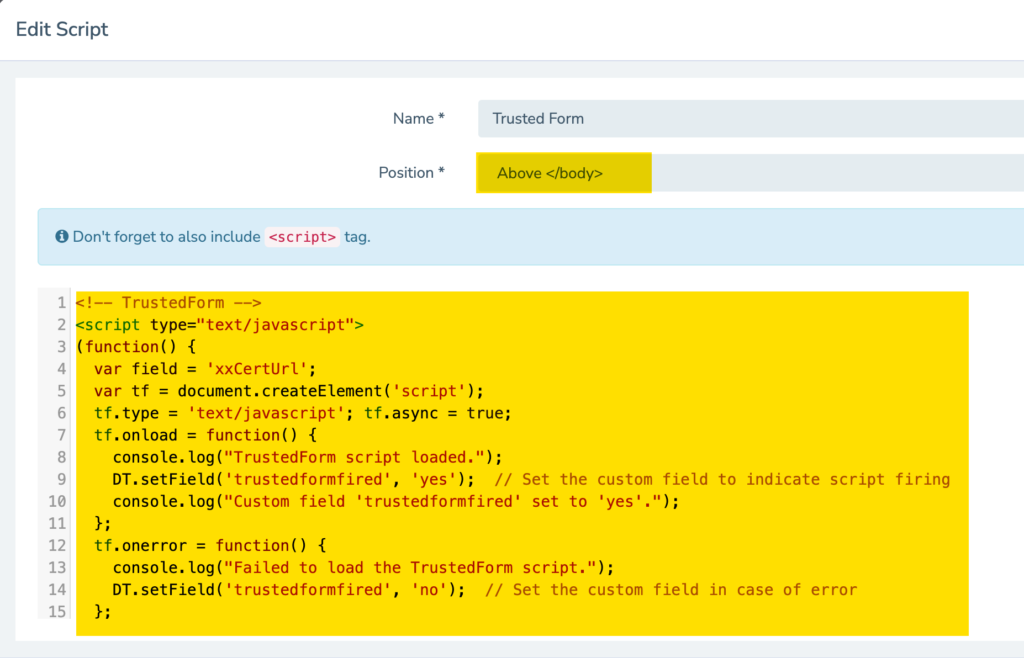
- Position: Place script in “above </body>” (Not Head Section). You can use the code below as-is.
- If you grab the code from your Trusted Form account then do not to forget to add this after the 3rd line: var field = ‘xxCertUrl’;
<!-- TrustedForm -->
<script type="text/javascript">
(function() {
  var field = 'xxCertUrl';
  var tf = document.createElement('script');
  tf.type = 'text/javascript'; tf.async = true;
  tf.onload = function() {
    console.log("TrustedForm script loaded.");
    DT.setField('trustedformfired', 'yes');  // Set the custom field to indicate script firing
    console.log("Custom field 'trustedformfired' set to 'yes'.");
  };
  tf.onerror = function() {
    console.log("Failed to load the TrustedForm script.");
    DT.setField('trustedformfired', 'no');  // Set the custom field in case of error
  };
  tf.src = ("https:" == document.location.protocol ? 'https://' : 'http://') + "api.trustedform.com/trustedform.js?field=xxTrustedFormCertUrl&ping_field=xxTrustedFormPingUrl&l=" + new Date().getTime() + Math.random();
  var s = document.getElementsByTagName('script')[0];
  s.parentNode.insertBefore(tf, s);
})();
</script>
<noscript>
  <img src="https://api.trustedform.com/ns.gif" />
</noscript>
<!-- End TrustedForm -->
Step 3: Copy and paste Script That Saves the Certificate
- Add the script (below) on any node where you wish to save the certificate.
- Can be first node but NEEDS to be fired on EXIT. You can also add this towards the end of your decision tree, can be EXIT or ENTER. It does not need to be around or near your phone field.
- Do not fire this upon Entry on your First Node as the Main Pixel needs to load first before this node level script fires.
<script>
  (function(){
      // starts a loop with interval of 100ms
  const interval = setInterval(getCertUrl, 100);
  function getCertUrl() {
  	const certElement = document.getElementById('xxTrustedFormCertUrl_0');
    const certUrl = certElement && certElement.value;
    // check if the certificate has been generated
    if (certUrl){
        // assign the generated token to LH custom field
      	DT.setField('xxtrustedformcerturl', certUrl);
        // logs the certificate to the console
        console.log("Certificate URL: ", certUrl);
        // Set additional custom field indicating the script has fired
        DT.setField('trustedformsaved', 'yes');
        console.log("Custom fields set and script completed.");
        // stops the loop
    	clearInterval(interval);
    }
  }
  })()
</script>
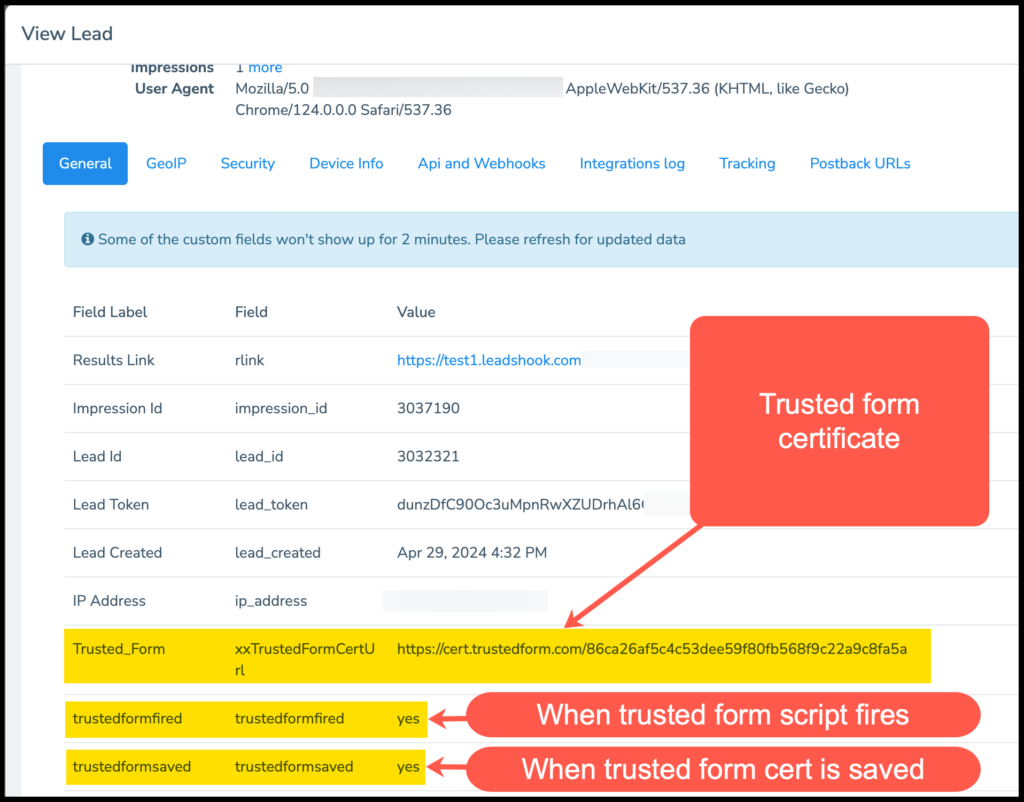
Step 4: Test & Verify Your Trusted Form Setup
- Publish and access Decision Tree
- Turn on the browser console
- You will see once you reach the node that the Trusted Form Certificate URL will display on the console

If you created all of the fields above, you will see respective custom fields updated as well.
Step 5: Map / Email / Distribute Your Trust Form URL
- The URL will resolve to a valid certificate

FAQs & Other Steps:
The steps below are usually added by your client or buyer of leads.
Claiming Certificate
Step 1: Add a Webhook Node after the form node where you placed the Trustedform script.
- You can also add it just right before the results node or add a delay node.
- It needs enough time for the certificate to generate before claiming.

Step 2: Set the request URL of the Webhook Node to the {xxTrustedFormCertUrl|raw}. This will carry the certificate URL and use it as the request URL
Step 3: Set METHOD to POST and BODY to JSON
Step 4: Add the the JSON payload below to your API Node.
- Please refer here to know what you can add as your own values for Retain and Verify:
Retain: https://developers.activeprospect.com/docs/trustedform/api/v4.0/tag/Retain/
Verify: https://developers.activeprospect.com/docs/trustedform/api/v4.0/tag/Verify/
{
  "match_lead": {
    "email": "{email}"
    "phone":"{YOUR_MOBILE_FIELD|no_leading_plus|no_spaces}"
  },
  "retain": {
    "reference": "YOUR_REFERENCE_VALUE",
    "vendor": "YOUR_VENDOR_VALUE"
  },
  "verify": {
  "languages": [
    {
      "text": "YOUR_CONSENT_TEXT"
    }
  ],
  "results": {
    "language_approved": true,
    "success": true
  }
}
}
Step 5: Add Accept = application/json to Header
Step 6: Add Authorization = Basic (Base64 Encoded value of API:YOUR_API_KEY)

Encoding value for Authorization
You can encode it here: https://mixedanalytics.com/knowledge-base/api-connector-encode-credentials-to-base-64/
Step 1: Add API: then your API KEY
Step 2: Click “Base64 Encode”
Step 3: Grab the Encoded value and add it as a value for your Authorization header after the word Basic


